Tuesday, December 1, 2009

CD COVER: FINAL PRODUCT

Front and Inside Left
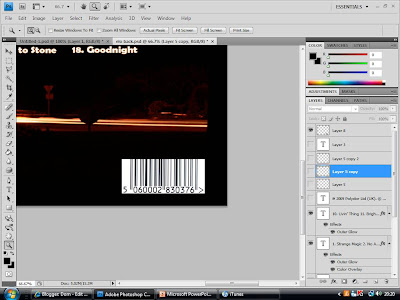

Back


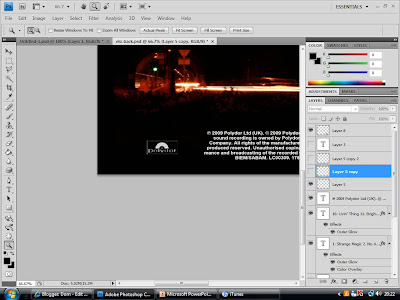
Inside Right (behind the CD)

CD COVER: AUDIENCE OPINION

CD Cover Review click to see link.

What I have learnt:

People generally seemed to find my CD Cover engaging, with its bold, but simplistic effect. The general messege of improvement however was for more infomation, possibly in the inner covers. One person found the text on the front possibly too small.

What I am going to do:

  • Add a little more infomation in general on the inner pages.
  • Make the titles on the front slightly larger.

CD COVER: FIRST DRAFT


Front Cover and Inside Left


Back Cover


Inside Right

CD COVER: MAKING OF THE INSIDE

1. I have already produced the inside left of the CD cover, as it is the back of the booklet, (seen on the front cover). This simply leaves the inside right of the CD cover to be created. This will be behind the transparent CD holster of the case. To create this i once again used Adobe Photoshop CS4.


2. I firstly began by making it the correct size , which is the same as the back of the CD cover minus the sides.

3. I then opened the image which i wished to use, and used the Select All option to Copy and Paste the image over to the inside cover.


4. After pasting onto the correct canvas, i then positioned the image so that is sat perfectly in the center. I also used the Transform Tool to make the image more circular, to go with the shape of the CD.

Tuesday, November 24, 2009

CD COVER: MAKING OF THE BACK COVER

1. I again used Adobe Photoshop CS4 to create the back of the CD cover. This will make the task simpler as it will create a likeness to the front design, as i will be using the same effects etc.

2. I then started a new piece, and measure up the back of a normal CD cover. the measurements were 150mm by 117mm, including 6mm on either side for the sides of the CD cover.
3. I divided it so that the sides were seperated from the central square. I next used the Fill Tool to give it a black background. This will match the front cover and give the entire cover continuity.


4. I then Copied the logo image from the front cover, and Pasted it in. Opening up the image I wished to use for the back cover and using the Polygonal Lasso Tool, i roughly cut round the part of the image i wanted, then Cut and Pasted it in the back cover.

5. After using the Tranform Tool to scale down the image to the correct size, i placed it in the desired position. I then used the Horazontal Type Tool to add the list of tracks for the album. This consists of two colloms. I then used the Blending Options to make them the same style as the title text on the front cover, including effects such as Outer Glow etc.


6. I then then Copied an image of a barcode and Pasted it onto my back cover. Using the Transform Tool, i scaled it to an appropriate size and placed it in the bottom right corner, as found through the conventions of CD covers.

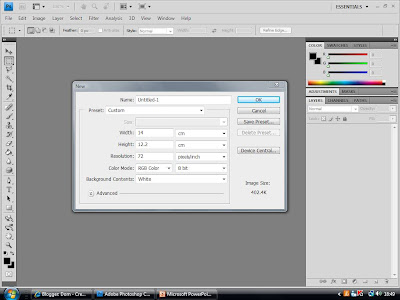
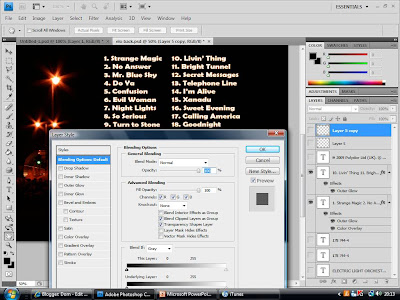
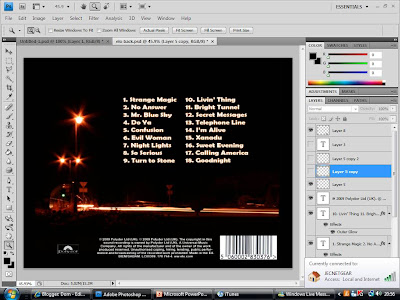
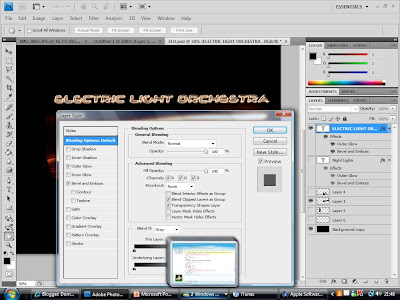
7. As also found in my research, i used the Horazontal Type Tool to create a small print with all the legal infomation on it. I copied the small print of a previous ELO album, but update all the dates etc. This will give the CD cover a further realistic look through detail.


8. I then took a picture of the "Polydor" logo, and used the Transform Tool to scale it down, simular to the size of the small print, and positioned it next to the legal information.

9. I next concentrated on the sides of the cover. I began by using the Fill Tool, and making the background of sides black, to go with the rest of the outside cover so far.
10. I then added the band name and album title using the Horizontal Type Tool, then used the Transform Tool to rotate it to fit on the side. I then Copied and Pasted the text, and rotated it so it fit on the other side.

11. I then added the "Polydor" logo on either side, along with a numerical code in small print, to make it all look convincingly realistic.

Monday, November 16, 2009

CD COVER: MAKING OF THE FRONT COVER

1. I used the programme Adobe Photoshop CS4 to create my CD cover.

2. After opening the programme, I clicked New, and typed in the measurements of the front cover. I worked out by measuring, that the inside booklet of a normal CD cover is 119 mm by 119, so to create a booklet, i had to include the folded back page, leading to a page 238mm by 119mm, and then divided the page in half.

3. I then used the Fill Tool to make the background layer black, and opened the image i was going to use in a different window.

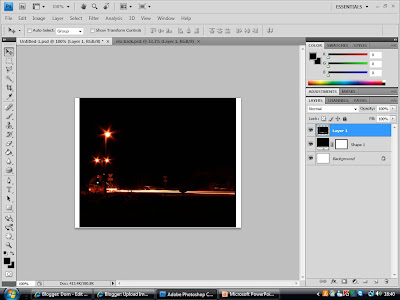
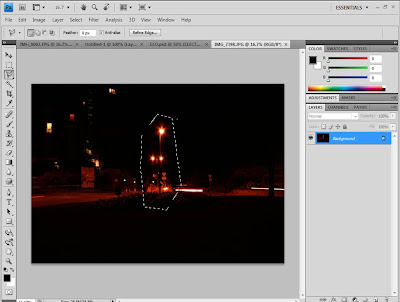
4. Using the Polygonal Lasso Tool, i cut round the part of the image i wanted roughly. I was able to do this roughly as the image has a black background itself, so would blend in well with my background.

5. I then Cut and Paste the image into my CD front cover cover, sclaing and rotating it until i was happy with its positioning.
6. Using the Gradient Tool, I made the edges fade into the background, to create a more cenral and smoother image.

7. I then used the Horizontal Type Tool to create the band name text at the top of the page. I selected an appropriate font which went well with the theme of lights, as it had a neon look to it. I then edited the font by adding particular Effects, such as Bevel and Emboss to make the text stand out more, and Outer Glow, which gives the text a simular glow to the lights in the main image.


8. Next i decided to add another image, as I felt that the cover was possibly too simple. So refering to the photos i took, i found an image which i felt would make an appropriate logo image. I open the image up in a new window again and cut around it, using the Polygonal Lasso Tool. Again this could be rough, as the image also had a black background.

9. I then Cut and Paste the image on to my CD cover, scaling and positioning it so that it was central and a good distance from the other image. I then used the Gradient Tool again to smoothen the edges so that it blended in well with the background.

10. Using the same font and effects as the band name, i created the text for the album title, "Night Lights" Which i positioned underneath both images centrally.
11. I then focused on the back of the booklet, which would be the left half of the opened case. I started by using the Fill Tool and giving it also a black background.

12. I then Copied and Pasted the logo image, Resized it, and placed the copy in the center of the back cover. I also inserted a short bit of text, which simply has a brief number on it in small print, to add to the realism of the product by appearing to be some sort of product code.

Sunday, November 15, 2009

CD COVER: PLANNING

When designing the CD cover i think it is important to take into consideration that the song itself is a quiet old song, as its the band themselves, however I am attempting to re-enter them into modern day times, and i think that the CD cover should show this. Below shows various idea's for the front cover, back and inside of the CD cover.

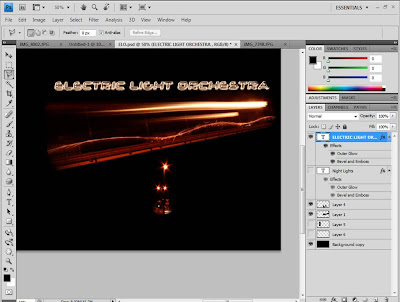
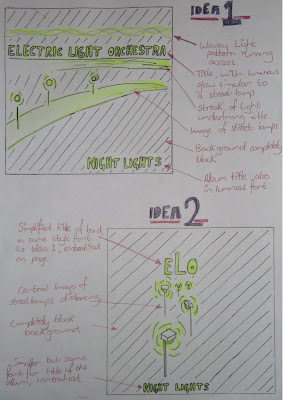
Above is the 2 ideas for the front of the CD cover. I decided that for the design I would play on the theme of lights, coming from the name of the band, "Electric Light Orchestra". I then decided that a nocturnal image of street lights would be fitting, as the music video is for the song "Mr. Blue Sky" and the album could have tracks sequencing as if along the time of day, ending with a song called "Night Lights". "Night Lights" also sounded like a good name for the album, relating to the image.

Idea 1 consists of a street light scene, streaming across the page in the centre, with the title of the band above it underline with a streak of light. The font for the title also would be illuminated similar to the style of a street lamp, as well as the title of the album on the bottom of the page. The background would be completely black to complete the nocturnal theme.

Idea 2 is much simpler than idea 1. It consist of a much simpler design, consisting of a central image. The image would be of street lamps fading out in the distance, with the title of the band on top in the same font as Idea 1. The image would act as the logo for the album, creating a recognisable and simple image for the audience to relate to the album. The background is again completely black, and the title of the album would also be centralised along with the rest of the image, in the same font as the title of the artists.


Above is the designs for the back and inside of the CD cover. Both need to continue the themes of the front of the CD cover to make it recognisable, and to bring the entire CD cover together.

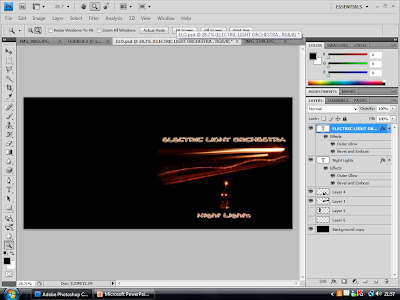
For the back, I have continued the simple design of street lights in a nocturne, and have decided to frame the track information with a street lamp and wavy light pattern. The font for the track information will be the same as on the front cover, however smaller to fit them all in. The wavy light pattern will also act as a border for the legal information in small print, as well as the barcode and production logos, all conventions of a normal CD cover, as found out in research.

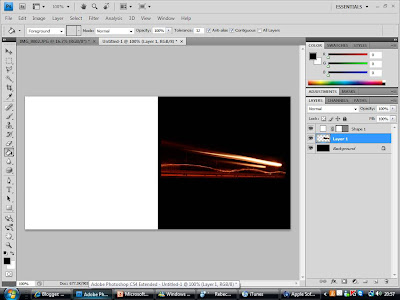
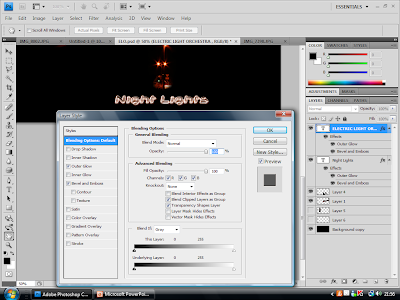
The inside of the CD case will also be very simple, with the plastic case being clear so that the images can be seen. on the left of the open case is the back of the leaflet, which will simply be black, with the album logo in the center. behind the CD holster would also be completely black, however with a horizontal wavy light pattern running across, which would also correspond with the CD top itself, which would also have this running across it.

Thursday, October 29, 2009

CD COVER: RESEARCH INTO SIMILAR MEDIA TEXT

I decided to research into CD covers which i own, so that i can analyse them closer by deconstructing them.
Example 1: Jason Mraz - We Sing, We Dance, We Steal Things.

To the left is the front of the CD cover, with the main image. The image is very simple, possibly drawn by a child, with appropriate informal text to match. This simplistic, childish look reflects the genre of the music well, as it is very fun and relaxed. The case of the CD is standard clear plastic, in a rectangular shape, and opens like a book. There is also a sticker on the front, for further promotion of the CD.


To the right is the back of the CD case. As you can see, the text matches the front cover of the CD case, so that it can be recognised as relevant. It is a very simplistic design, with no pictures and a plain white background, with the title of the tracks in order of the playlist. Conventions to note are the track names, the barcode, the legal information, and the producing labels.

Above is the inside of the CD case. This again is very simplistic, as it has the back of the booklet for the cover of the CD case on the left, which consists of the name of the manager and information, along with more legal information. The CD holster itself is a black translucent plastic, however goes well with the black and white design of the entire case.

Example 2: Take That - The Circus

To the left is the front of the CD cover. It differs in many ways from the previous example, as it is considerably fuller in the sence that the entire page is covered in colour. The image depicts the 4 band members preforming a trapeze act which is appropriate as the album is called the circus. The background has been edited in as a blue sky, and all the band members are wearing blue cloathing, which is a thematic colour of this album. The text is very simple a the top, small but recognisable, and central on the page.


The back of the album cover (to the right) has the same background image of clouds as the front cover. This image is continuous all the way round the album sides, so that the sides match the rest of the cover. The text is again central and the font is the same style and colour as the front cover, and has the infomation in small print at the bottom, simular to the previous example. The barcode for this album was stuck on.

Above is the inside cover. the image is again a blue sky, with the top of a circus tent on the right. The image again appears continuous on the two images, giving a together feel. There is a small logo in the center of the page on the left, which is the "Take That" logo. Unlike the previous example, this case has gone for a more complex design, with a clear, see-through plastic, so that an inside design can be seen.

Monday, September 21, 2009

MUSIC VIDEO: VIDEO EVALUATION


Below are 2 video evaluations of my music video:

CAMERA EVALUATION:


EDITING EVALUATION


Apologies about the reference to the silence at the beginning of the video, this was done before the change was made.

Sunday, September 20, 2009

MUSIC VIDEO: FINAL PRODUCT

YOUTUBE LINK

**apologies about the jumpiness of the sound at the ending and the beginning rain sounds, this happened during exporting and is not meant to be like that.

Friday, September 18, 2009

MUSIC VIDEO: AUDIENCE FEEDBACK

Music Video Review  click to see the link.

What I learnt:

People seem to think that it is a well constructed video and relivant to the music. Favorite areas seem to be the green screen bits, aswell as the chorus shot.
Areas which people weren't so sure on was the silence at the beginning, which they found slightly confusing, as well as the end, which has a shot that drags on too long.

What I need to do:
  • Add ambience sounds at the beginning of some sort.
  • Cut down the ending or use other shots.

Wednesday, September 16, 2009

MUSIC VIDEO: MAKING OF

After planning out each shot of the music video, i then began production. I filmed my shots in a variety of places, the JCG media room (green screen), various streets of Jersey, gardens, parks houses etc. Once gathering enough footage, I then decided to start editing.

For my editing, I used an Apple Mac and the software iMovie HD.


I began by uploading all of the clips i had filmed into iMovie.


I started by creating the silent introduction that is not accompanied by the track. This would help me know where to put the music. I started by draggin the clips into the timeline in the correct order.


I then use the split tool to cut my clips to the appropriate length, so that my music video had conventional continuity editing.


After i was satisfed with the cuts, and that the clip rolled together well, i then imported the music track, to the part of the playhead that i wished for it to start. this would give me a outline of the timings for the clips to follow.

The first shot to edit together with the music was the 32 beat scene (as explained in planning). This required the majority of shots edited together within the space of 12 seconds, all with precise timing, making this one of the hardest bits of editing. By building the clips up in order, and cutting them to the correct length, i was eventually able to get the timings correct.

To create the effect of the sky changing from grey to blue, i used the video effect tool gamma adjust on the clips of the sky that i had filmed.

Once cutting the rest of the clips together, it was time to create the green screen background.

Creating the green screen backdrop

To create the backdrop, I started by getting an image of the UK, from the internet, then editing it so only the outline of the image showed, using photoshop, as shown below.

I then used photoshop to colour the image in, creating a large blue space to the left of the UK, where the weather man can stand, making sure that the ratio of the image would fit the green screen.


After doing this, I then created cartoon images of the sun and clouds that would eventually layer on top of the UK image.


To create the animation, i used Macromedia flash. I started by putting in the background image.

I then created a time scale appropriate to the length that it was in shot for, adding the other 2 images a variety of times to give the impression of a weather forecast.

I then created different layers so that the images would appear one at a time, in beat with the music.

To create the motion of the clouds moving off the screen, I used a motion tween for the cloud layers, making them all move in unison.
I then had my full green screen backdrop, which i exported as a movie file. The video below shows how I applied this effect to my greenscreen shots:
VIDEOS WONT UPLOAD (ask to see at school)
Another particular tricky shot to edit was the screen spilt into 3 sections for the chorus of the song. Below is a video showing how this was done:

VIDEOS WONT UPLOAD (ask to see at school)

Once i had finished putting all the clips together, i began working on the finishing touches. I added certain transitions in various places for various effects, such as the impression of time passing etc by using a fade in and fade out. Also, the Circle Closing effect is used specifically in a shot to give the impression of the forecast being turned off, going with the narrative of the story.


To co-inside with the video fading out, i decided to fade out the end of the track, by lowing the audio bar slowly.


The last touch I added to the video was to place a title at the beginning, a convention i picked up from my research. I did this from the Title option, which one of them happened to be Music Video.